
1. Introduction
1. Document Version: V1.0
2. White Paper Compilation Unit: Shandong Hengmei Electronic Technology Co., Ltd.
3. Compilation Date: November 21, 2025
4. Core Positioning: This white paper presents the complete product information of Hengmei Intelligent Manufacturing's Kinematic Viscosity Meter (Model HM-YN1) in a structured. It covers product basics, core technologies, technical parameters, application scenarios, installation, and operation guidelines. It is designed to provide accurate data support for product promotion, user selection, on-site testing, and quality control in industries such as petroleum, chemical engineering, pharmaceuticals, and food, helping users quickly master the instrument's functions and application methods.
2. Table of Contents
1. Introduction
2. Table of Contents
3. Product Basic Information
4. Core Technologies and Functional Features
5. Detailed Technical Parameters
6. Application Scenarios and Industry Adaptation
7. Accessories and Consumables Configuration
8. Instrument Installation Steps
9. Instrument Use and Operation Steps
10. Sample Detection Steps
3. Product Basic Information
1. Product Name: Hengmei Intelligent Manufacturing Kinematic Viscosity Meter
2. Model and Market Positioning: The model is HM-YN1. It is a dedicated testing instrument designed and manufactured in accordance with the national standard GB/T265-88 "Determination of Kinematic Viscosity of Petroleum Products". It is used to measure the kinematic viscosity of liquid petroleum products (Newtonian liquids) by timing the flow time of a fixed volume of liquid through a calibrated glass capillary viscometer (Ubbelohde or Ostwald type) under gravity at a constant temperature, and automatically calculating the final kinematic viscosity result. It is positioned as a high-precision, intelligent testing equipment for quality inspection, process control, and scientific research in industries such as petroleum, chemical engineering, pharmaceuticals, food, and scientific research institutions.
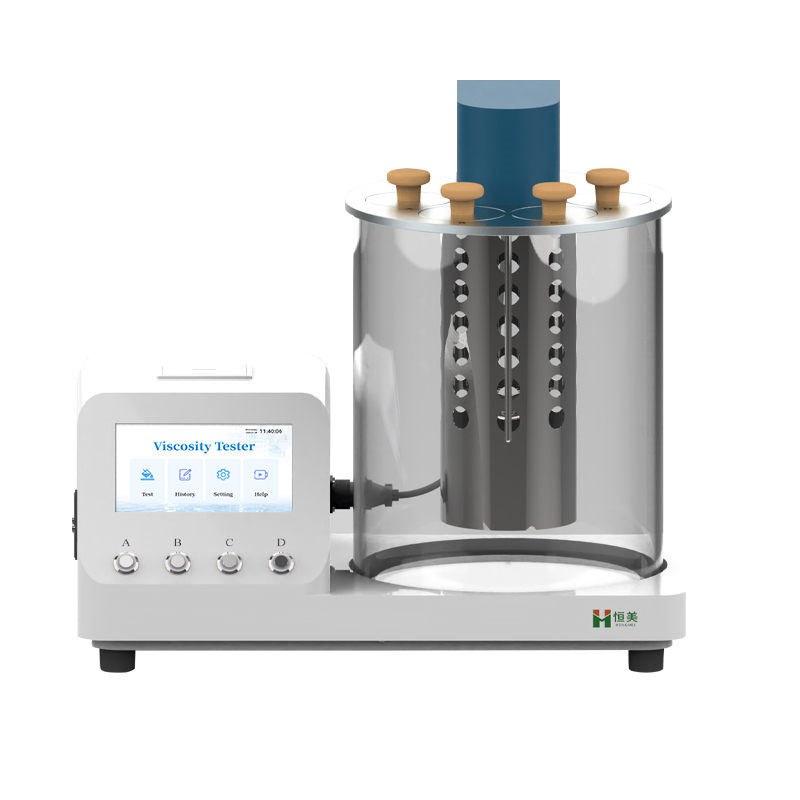
3. Product Appearance and Structure: The instrument has an overall size of 530mm×310mm×232.5mm (Length×Width×Height) and a packaging size of 650mm×440mm×570mm, with a packaging weight of 21kg. The front panel is equipped with a 7-inch industrial color touchscreen for operation and result display, enabling intuitive interaction. The internal structure includes a constant temperature water bath (for holding the viscometer), an electric heating unit (for temperature control), a German Class A Pt100 stainless steel temperature sensor (for temperature detection), and a built-in data storage module (for storing test results). The top of the instrument is designed with four experimental ports, allowing simultaneous testing of four sets of samples to improve work efficiency. A viscometer clamp is provided to fix the viscometer vertically, ensuring accurate flow time measurement.
4. Core Technologies and Functional Features
1. High-Precision Constant Temperature Control Technology: The instrument adopts an electric heating unit with a maximum heating power of 1600W, combined with a German Class A Pt100 stainless steel temperature sensor (with built-in temperature correction). It achieves a temperature control range from room temperature to +150°C with a temperature accuracy of ±0.01°C. This technology ensures a stable and uniform temperature environment in the water bath, which is crucial for accurate kinematic viscosity measurement (as viscosity is highly temperature-dependent).
2. Dual Viscometer Compatibility Technology: The instrument supports two testing methods using Ubbelohde and Ostwald viscometers, meeting the testing needs of different types of liquid samples (e.g., petroleum products, polymer solutions, pharmaceuticals). Users can select the appropriate viscometer based on the sample's properties and testing standards.
3. Intelligent Data Processing and Storage Technology: Equipped with a high-performance MCU (Microcontroller Unit) for control, the instrument can automatically calculate the kinematic viscosity result by multiplying the viscometer's capillary constant with the measured flow time. It has a built-in data storage capacity of 10,000 sets of test results, allowing users to view historical data at any time. This eliminates the need for manual calculation and data recording, reducing human error and improving testing efficiency.
4. Flexible Temperature Calibration Technology: The instrument supports both single-point and multi-point temperature calibration options. Single-point calibration is suitable for users who frequently test at a single temperature point, while multi-point calibration (supporting up to multiple points) ensures temperature accuracy across the entire temperature range. This adaptability meets the calibration needs of different application scenarios and maintains long-term testing accuracy.
5. Efficient Multi-Channel Testing Technology: With four experimental ports, the instrument can test four sets of samples simultaneously. This significantly improves work efficiency, especially for laboratories with large testing volumes (e.g., petroleum product quality inspection centers, chemical production lines).
6. User-Friendly Operation Design: The 7-inch industrial color touchscreen simplifies operation, requiring only simple training for operators to master. The interface displays key information such as set temperature, current temperature, flow time, and kinematic viscosity results in real time. The instrument also supports basic operations such as parameter setting, data query, and calibration through the touchscreen, enhancing user experience.
5. Detailed Technical Parameters
1. Testing Methods: Ubbelohde viscometer method, Ostwald viscometer method
2. Temperature Control:
◦ Temperature Range: Room temperature to +150°C
◦ Temperature Accuracy: ±0.01°C
◦ Temperature Sensor: German Class A Pt100 stainless steel probe (with built-in temperature correction)
◦ Heating Mode: Electric heating unit; Maximum Heating Power: 1600W
1. Display: 7-inch industrial color touchscreen
2. Temperature Calibration: Single-point calibration, multi-point calibration (optional)
3. Data Storage: 10,000 sets of test results
4. Physical Parameters:
◦ Instrument Dimensions (Length×Width×Height): 530mm×310mm×232.5mm
◦ Packaging Dimensions (Length×Width×Height): 650mm×440mm×570mm
◦ Packaging Weight: 21kg
1. Working Environment:
◦ Temperature: 10-35°C
◦ Relative Humidity: Not more than 50%
◦ Working Voltage: 220V 50Hz
1. Compliance Standards: GB/T265 "Determination of Kinematic Viscosity and Calculation of Dynamic Viscosity of Petroleum Products"; GB/T1841 "Test Method for Gel Viscosity of Polyolefin Resins"; SY/T5651 "Technical Specifications for Petroleum Product Kinematic Viscosity Testers"
6. Application Scenarios and Industry Adaptation
1. Petroleum Industry: Used for testing the kinematic viscosity of petroleum products such as gasoline, diesel, lubricating oil, and fuel oil. It helps determine product quality grades, ensure compliance with fuel efficiency and lubrication performance requirements, and support production process control and finished product inspection.
2. Chemical Engineering Industry: Applied to measure the kinematic viscosity of solvents (organic solvents, inorganic solvents) and polymer solutions (polyvinyl alcohol, polyacrylamide). It provides data support for optimizing chemical reaction processes, controlling product viscosity (to ensure product performance such as fluidity and coating properties), and conducting quality inspection of chemical products.
3. Pharmaceutical Industry: Used to test the kinematic viscosity of pharmaceutical preparations such as ointments, oral liquids, and injections. Viscosity is a key indicator affecting the quality, stability, and administration of pharmaceuticals (e.g., ensuring uniform drug distribution in ointments, appropriate flow rate of injections). The instrument helps pharmaceutical manufacturers comply with pharmacopoeia standards and ensure product safety and effectiveness.
4. Food Industry: Suitable for testing the kinematic viscosity of food additives (thickeners, stabilizers), beverages (fruit juices, carbonated drinks, dairy products), and syrups (corn syrup, fructose syrup). It helps control the texture, taste, and stability of food products (e.g., ensuring proper thickness of dairy products, preventing sedimentation of fruit juices) and meets food safety and quality standards.
5. Printing Industry: Used to measure the kinematic viscosity of inks (water-based inks, solvent-based inks) and glues (printing glues, adhesives). Proper viscosity ensures smooth printing (avoiding ink bleeding or blurring) and strong adhesion of glues, improving printing quality and product reliability.
6. Textile Industry: Applied to test the kinematic viscosity of textiles dyes and printing pastes. Viscosity affects the uniformity of dyeing and printing (e.g., ensuring consistent coloration of fabrics, preventing paste clogging of printing screens), supporting quality control in textile production.
7. Cosmetics Industry: Used to measure the kinematic viscosity of skincare products (creams, lotions, serums) and personal care products (shampoos, body washes). Viscosity is critical for product texture, application feel, and stability (e.g., ensuring creams are easy to apply without being too thin or too thick), helping cosmetics manufacturers meet consumer expectations and quality standards.
8. Scientific Research Institutions: Suitable for basic research on the physical properties of liquids (e.g., studying the relationship between temperature and viscosity of new materials) and testing the kinematic viscosity of new materials (new polymers, nanomaterials). It provides reliable experimental data for scientific research projects and the development of new products.
7. Accessories and Consumables Configuration
1. Standard Accessories
◦ 1 HM-YN1 kinematic viscosity meter host
◦ 1 power cable (matches working voltage 220V 50Hz)
◦ 1 cleansing bath tub (size 270mm×335mm, for cleaning viscometers)
◦ 1 water bath tub lid (for covering the water bath to maintain temperature stability)
◦ 1 WS20 connection line (length 300mm, for connecting the water bath tub lid to the host)
◦ 4 viscometers (including Ubbelohde and Ostwald types, for different testing methods)
◦ 4 insulation covers (for insulating the viscometer and reducing temperature interference)
◦ 1 test form (for manual recording of test data, as a backup for electronic storage)
◦ 4 viscometer clamps (for fixing the viscometer vertically in the water bath)
◦ 1 sand core funnel (100ml, for filtering samples to remove impurities that may block the viscometer capillary)
◦ 1 glass syringe (35ml, for filling samples into the viscometer)
◦ 2 fuses (10A, for protecting the instrument's electrical circuit)
◦ 1 aurilave (60ml, for cleaning the viscometer)
◦ 1 latex tubing (size 6×9mm, for connecting the viscometer to the syringe or other accessories)
◦ 1 operating instruction (detailing instrument functions, installation steps, operation methods, and maintenance)
◦ 1 certificate (certifying the instrument's compliance with quality standards and calibration status)
1. Consumables
◦ Cleaning solvents (e.g., alcohol, gasoline, fuming sulfuric acid, dichromate solution, for cleaning the viscometer to remove residual samples)
◦ Water bath medium (water for temperatures below 50°C; mineral oil or glycerin for temperatures above 50°C, to maintain stable temperature in the water bath)
◦ Replacement fuses (10A, for replacing damaged fuses)
◦ Replacement latex tubing (size 6×9mm, for replacing aging or damaged tubing)
8. Instrument Installation Steps
1. Unpacking and Inspection: Open the instrument package and check whether all accessories (host, power cable, viscometers, clamps, etc.) are complete and intact according to the configuration list. Confirm that the instrument host has no scratches or damage, and the touchscreen is free of cracks. If any missing or damaged parts are found, contact the manufacturer or local agent in a timely manner.
2. Instrument Placement: Place the instrument steadily on a level operating table. Ensure that there is sufficient space around the instrument (at least 30cm on all sides) for heat dissipation, accessory storage, and operation. Avoid placing the instrument near heat sources, direct sunlight, or areas with large temperature fluctuations, as this may affect temperature control accuracy.
3. Water Bath Assembly: Place the water bath tub in the designated position of the instrument's main water bath. Then, place the water bath tub lid on top of the water bath tub. Connect the water bath tub lid to the host using the WS20 connection line, and ensure the connection is stable and secure (loose connections may cause temperature control failures).
4. Water Bath Medium Addition: Add the appropriate water bath medium according to the intended testing temperature. For temperatures below 50°C, use water as the medium; for temperatures above 50°C, use mineral oil or glycerin. Add the medium until it reaches the marked level on the water bath tub (ensuring that the viscometer's sample-containing part can be fully immersed in the medium to maintain constant temperature).
5. Power Connection: Connect one end of the power cable to the instrument's power interface (located at the back of the host) and the other end to a properly grounded 220V 50Hz power socket. Ensure the power socket is in good condition and has a stable power supply to avoid instrument damage due to voltage fluctuations.
6. Power-On Check: Turn on the power switch (located at the lower left side of the instrument). The instrument will initialize, and the touchscreen will light up and enter the main interface. Check whether the touchscreen responds normally, and whether the temperature display, button functions, and other indicators work properly. If any abnormalities are found (e.g., no display, unresponsive touch), turn off the power immediately and check the power connection or contact after-sales support.
9. Instrument Use and Operation Steps
9.1 Pre-Operation Preparation
1. Viscometer Cleaning: Select an appropriate viscometer (Ubbelohde or Ostwald type) based on the sample's estimated viscosity and testing method. Clean the viscometer thoroughly: first, wash it repeatedly with a solvent that can dissolve residual samples (e.g., alcohol for oil-based samples); then soak it in fuming sulfuric acid or dichromate solution for 2-3 hours to remove stubborn residues; finally, rinse it with tap water and steam, and dry it in an oven at around 150°C or invert it at room temperature for several days until completely dry (residual moisture or samples will affect test results).
2. Sample Preparation: Filter the sample using the sand core funnel to remove impurities (impurities may block the viscometer's capillary and cause inaccurate flow time measurement). For samples with high viscosity, preheat or cool them to a temperature close to the testing temperature to facilitate filling into the viscometer.
3. Temperature Setting: On the instrument's main interface, click the "Settings" option to enter the temperature setting interface. Use the touchscreen to input the desired testing temperature (within the range of room temperature to +150°C), then click "Confirm" to start heating. The instrument will automatically control the temperature of the water bath medium, and the current temperature will be displayed in real time on the interface. Wait until the current temperature stabilizes at the set temperature (with a fluctuation of ±0.01°C) and remains constant for at least 10 minutes before proceeding to the next step.
9.2 Testing Operation
1. Viscometer Installation: Fix the cleaned and dried viscometer on the viscometer clamp, and adjust the clamp to ensure the viscometer is vertically placed (verticality is critical for accurate flow time measurement; tilting will cause errors). Immerse the viscometer's sample-containing part into the water bath medium, ensuring that the medium level reaches the marked line on the viscometer. Cover the water bath with the insulation cover to reduce temperature interference from the external environment.
2. Sample Filling:
◦ Ubbelohde Viscometer: Use the glass syringe connected to a small glass tube or a rubber bulb (ear syringe) to fill the sample. Hold the viscometer with your left hand and block the opening of the large tube with your index finger. Invert the viscometer and insert the long glass tube with the capillary into the sample. Pull the syringe to draw the sample into the viscometer until the liquid surface aligns with the second ring line. Then, stand the viscometer upright, install the reverse flow setup, clamp the rubber tube tightly, and fit it over the tube used for drawing samples.
◦ Ostwald Viscometer: Directly introduce the sample into the viscometer through the tube using the glass syringe, until the liquid surface reaches the specified ring line.
1. Constant Temperature and Flow Time Measurement: After filling the sample, keep the viscometer in the water bath for 10 minutes to ensure the sample temperature is consistent with the water bath temperature. On the instrument's main interface, click the "Test" option to enter the test interface. Select the corresponding channel (for the four experimental ports) and click the "Start" button. The instrument will automatically start timing when the liquid surface of the sample in the viscometer passes the first ring line, and stop timing when it passes the second ring line. The measured flow time will be displayed on the interface. Repeat the measurement 3-4 times (excluding abnormal values) and take the average flow time for calculation.
2. Viscosity Calculation: The instrument will automatically calculate the kinematic viscosity of the sample using the formula: Kinematic Viscosity (mm²/s) = Capillary Constant of Viscometer (mm²/s²) × Average Flow Time (s). The calculated kinematic viscosity result will be displayed on the interface. If dynamic viscosity needs to be obtained, multiply the kinematic viscosity by the sample's density at the testing temperature (dynamic viscosity = kinematic viscosity × density).
9.3 Post-Testing Operation
1. Data Storage and Query: Click the "Save" button on the test interface to store the test results (including flow time, temperature, capillary constant, and kinematic viscosity) in the instrument's internal memory. To query historical data, click the "Records" option on the main interface, where you can view, print (if a printer is connected), or export (using a USB flash drive inserted into the USB port) the stored test results.
2. Viscometer Cleaning and Storage: After the test, remove the viscometer from the clamp, empty the residual sample, and clean it again using the same method as pre-operation cleaning. Dry the viscometer and store it in a clean, dry container to avoid dust or contamination.
3. Instrument Shutdown: Turn off the instrument's power switch, disconnect the power cable from the socket, and clean the instrument's surface with a dry cloth to remove any dirt or spills. Cover the instrument with a dust cover (if available) to protect it from dust.
10. Sample Detection Steps
1. Sample Collection: Collect a representative sample of the liquid to be tested (e.g., petroleum product, pharmaceutical preparation, food syrup) using a clean and dry sampling container. Ensure the sample is free of bubbles, impurities, or sediment (if present, filter using the sand core funnel before testing).
2. Pre-Testing Check: Confirm that the instrument is properly installed and calibrated (conduct single-point or multi-point calibration if the instrument has not been calibrated for a long time or if testing accuracy is in doubt). Check that the water bath medium is sufficient and clean, and the viscometer is clean and dry.
3. Temperature Setting and Stabilization: Set the testing temperature according to the relevant standards or sample requirements (e.g., 40°C for lubricating oil, 25°C for pharmaceuticals). Start the instrument's heating function and wait until the water bath temperature stabilizes at the set temperature (±0.01°C) for 10 minutes.
4. Viscometer Preparation and Installation: Select the appropriate viscometer (Ubbelohde or Ostwald) based on the sample type and testing method. Clean and dry the viscometer, then install it vertically on the clamp and immerse it in the water bath medium.
5. Sample Filling and Constant Temperature: Fill the sample into the viscometer according to the viscometer type (as described in Section 9.2.2). Keep the viscometer in the water bath for 10 minutes to ensure the sample temperature matches the water bath temperature.
6. Flow Time Measurement: Start the instrument's timing function and record the flow time of the sample through the viscometer's capillary. Repeat the measurement 3-4 times, discard any abnormal values (e.g., values that differ by more than 5% from the average), and calculate the average flow time.
7. Viscosity Calculation and Result Evaluation: The instrument automatically calculates the kinematic viscosity using the average flow time and the viscometer's capillary constant. Compare the calculated kinematic viscosity result with the relevant standard requirements (e.g., petroleum product quality standards, pharmacopoeia specifications) to evaluate whether the sample is qualified.
8. Data Recording and Reporting: Record the test results (sample name, testing temperature, flow time, kinematic viscosity, operator, testing date) in the test form or export them to a PC for generating a test report. Archive the report for quality control and compliance verification.
9. Post-Detection Cleaning and Maintenance: Clean the viscometer, instrument, and accessories thoroughly. Turn off the instrument power, store the viscometer and consumables properly, and perform routine maintenance (e.g., checking the power cable for damage, cleaning the water bath tub) to ensure the instrument's long-term stable operation.
Article address:https://www.petrocheminstrum.com/news/68.html